 |
 |
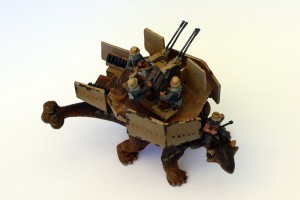
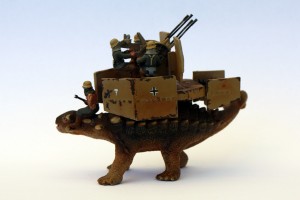
Just received two of these behemoths in the post from Eureka. The Ankylosaurus itself is actually a Schleich model and surprisingly well detailed. All it needs is a good paint job and it will do very nicely. Naturally though, I can’t leave it alone so I’ll add a little putty on the club tail and claws to enhance it a bit further.
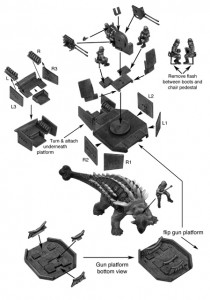
The kit comes as 26 parts, which looks pretty daunting when you tip them out in a big pile on the cutting mat. But sifting through them, it’s soon apparent that construction is pretty straight-forward. There are 10 parts for the crew and Flakvierling and 15 parts for the armoured howda and driver, plus the dinosaur.

Tools Used:
Superglue
Needle file
Hobby Knife
Pin Vice and 0.8mm drill bit (optional)
Brass Wire 0.8mm (optional)
Milliput or Green Stuff
Pre-assembly
Clean any flash and mould lines off the model parts and test each one for fit (see below for where some of the parts are supposed to go). You may need to file back some of the pins or perhaps drill out the holes to ensure a neat fit. Using a pair of clippers and a file, remove the flash from between the loaders’ legs and the seat pole.
Assembling the Howda
On the underside of the howda, you will see an arrow and an L and an R engraved into the metal. This will help you identify where the side armour is supposed to go. Each armour panel is marked with an L or R and is numbered from 1 to 3. Starting from the front of the model (indicated by the arrow), panels 1 and 2 are fitted in sequence. Panel 3 goes on the rear of the howda as part of the ammunition platform.
Superglue panel L1 on to the base, with the writing facing the inside of the model. There are three pins on the panel and a corresponding set of holes on the base. Once that has set, superglue on panel L2. There will be a smallish gap between the panels, but we’ll fill that with milliput once it’s all set. Now, take a needle file and round the top corners off at the front of L1 and the rear of L2.
Repeat for panels R1 and R2.
Turn the base over and glue on the three supports into the recesses provided. They only go in one way, so don’t worry if they look skewed a bit – they’re supposed to be like that.
Once these are all set, superglue panels R1 and R2 to the other side. The howda is nearly finished.

Glad your back at mate looks awesome
Alan, it looks pretty darn hot! And its the first time I’ve seen an assembly sheet for a Eureka model 🙂
cheers greg